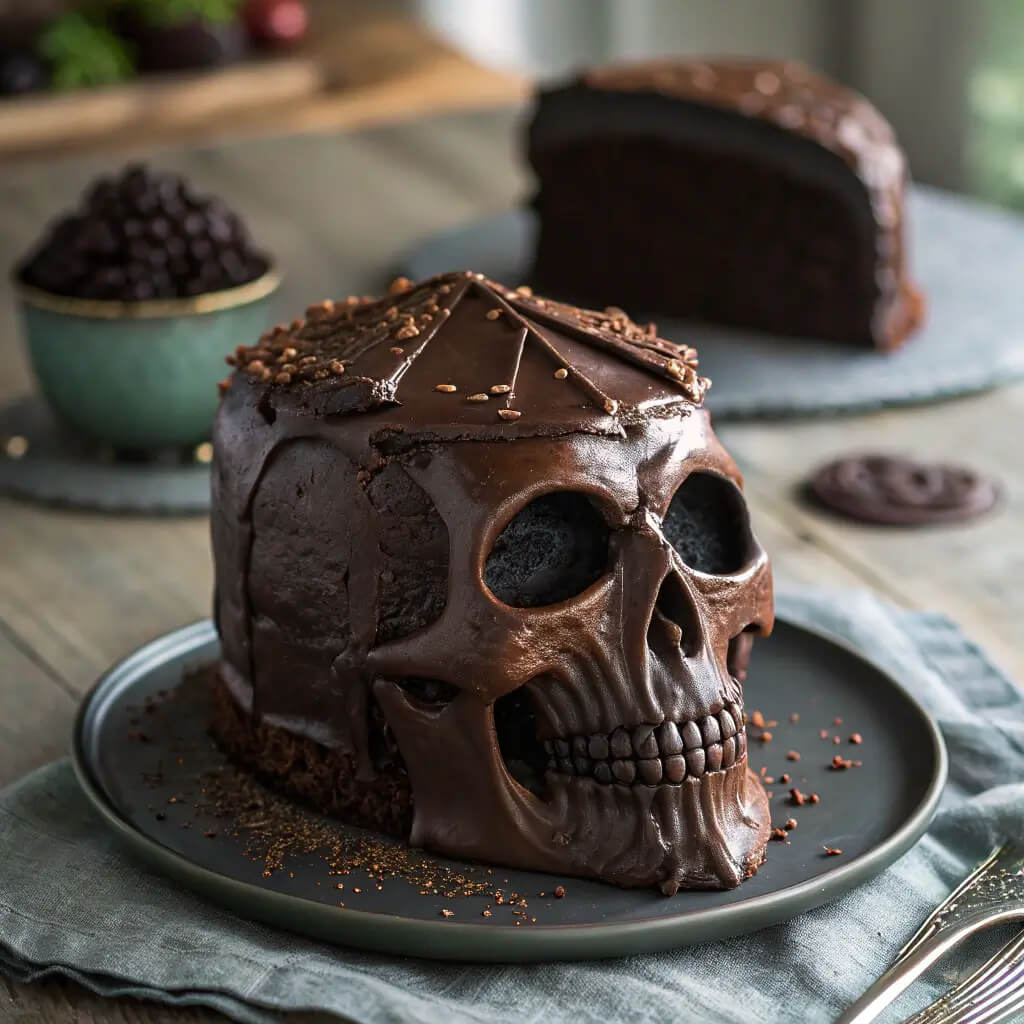
Chocolate skull cake, a spooky and delicious treat for Halloween
Once upon a time, in a galaxy not so far away (also known as my kitchen), I stumbled upon the most extraordinary recipe that turned my Halloween preparations from drab to fab. Picture this: I was sifting through countless recipes, desperately trying to find the perfect treat to scare and delight my friends at our annual Halloween party. It was like looking for a needle in a haystack, or better yet, a fun-sized candy bar in a bag of trick-or-treats. I wanted something that would make kids squeal and adults reminisce about their beloved childhood Halloweens—then I found it, the Chocolate Skull Cake.
As the title suggests, this dessert is totally a “of-course-I-played-Dr.-Frankenstein-in-my-kitchen” type of creation. Not only is it spooky, but it’s also a chocolate lover’s dream—rich, decadent, and utterly delightful. I can’t remember the last cake that had me dancing with joy like a kid with a bag full of candy. The moment I took my first bite, I knew I had to share it with the world and, you know, potentially gain some Halloween street cred.
So here I am, ready to take you on an exciting journey through the shadows of baking, laughter, and delightful chaos as we create this peculiar yet brilliant cake together. Grab your aprons, dust off that mixing bowl, and let’s dive into the spook-tacular world of chocolate delights!
Why This Recipe Is Great
- It’s spooky and fun – Who doesn’t want to serve a cake that looks like it came straight from a haunted house? It’s sure to be the main attraction of your Halloween spread.
- It satisfies all the chocolate cravings – This cake is so chocolaty that it could probably pull off a heist at a cocoa factory. Each slice is like a sweet indulgence that your taste buds will thank you for.
- It’s super easy to make – Trust me, if I can whip this up without causing a kitchen disaster, so can you! It’s practically foolproof. Even my cat could probably make it (not that she would).
- Fun for all ages – This cake is perfect for kids and nostalgic adults alike. It’s like a family reunion in a baking tin. Everyone loves chocolate, and adding a little spookiness never hurt anyone.
- Great for decorating – This cake is your blank canvas. You can let out your inner artist and adorn it with various decorations, from spooky designs to colorful sprinkles. The possibilities are endless!
Preparation & Cooking Time
- Total Time: 2 hours
- Preparation Time: 30 minutes
- Cooking Time: 30 minutes
- Cooling Time: 1 hour
- Servings: 12 servings
- Calories per serving: Approximately 350-400 calories
- Key Nutrients: Protein: 5g, Carbs: 50g, Fat: 20g
Ingredients You Need
So you want to dive into cake-making? Well, let’s make our shopping list an adventure. Get ready to channel your inner treasure hunter in the baking aisle:
- 2 cups of all-purpose flour – The backbone of our baking adventure. Think of it as the graveyard where all the goodies come to life.
- 2 cups of granulated sugar – Sweet like your childhood dreams and just as essential for any cake.
- 1 ½ cups of unsweetened cocoa powder – This is where the magic happens. It’s the black magic that makes your cake dark and mysterious.
- 1 cup of butter – Because butter makes everything better, and that’s a fact!
- 4 large eggs – The marvelous yellow orbs that will help bind all of our spooky ingredients together.
- 1 cup of milk – The potion that makes things creamy and delicious!
- 1 tablespoon of baking powder – This is the little guy that lifts our cake to new heights, like a ghostly spirit rising from the grave.
- 1 teaspoon of vanilla extract – The secret weapon to elevate our flavors and add some charm to the recipe.
- Decorative elements like icing, chocolate chips, or creepy candies – This is where you can let your artistic self shine! Make that cake reflect your spooky personality.
Ingredient Highlights & Variations
Now that we’ve gathered our cast of characters, let’s get to know our star performers a little better and see how we can mix things up.
- Cocoa Powder: Unsweetened cocoa powder is a game changer. Did you know it’s high in antioxidants? Enjoying chocolate can actually be good for you. Imagine saying, “I’m doing this for my health,” when you indulge!
- Butter: There’s truly no substitute for the rich, creamy texture that butter brings to a cake. If you want to mix it up, try using olive oil for a different flavor profile. Although, let’s be honest, it’s not going to taste the same.
- Milk: While I’m all about the whole milk life, you could switch it up with almond milk or even coconut milk. Just remember, each type of milk has its own character. Coconut milk brings a tropical twist that might just surprise you!
- Eggs: If you cater to vegans in your life, you can substitute eggs with flaxseed meal or applesauce. Not that I’m judging anyone for their dietary choices; I respect all eaters!
- Decorations: Get creative! From fondant to edible glitter, adding a ghoulish twist makes this cake perfect for your Halloween party. You can even use gummy worms to create ‘crawling’ effects. The more gruesome, the better.
Step-by-Step Instructions
Now, here comes the fun part! Grab your whisk, and let’s get this haunting creation rolling:
- Step 1: Preheat your oven to 350°F (175°C). This is like creating the perfect atmosphere for our ghostly creation.
- Step 2: In a large bowl, whisk together the flour, sugar, cocoa powder, baking powder, and a pinch of salt. Let’s get that delightful cocoa fragrance wafting through the air.
- Step 3: In another bowl, cream the butter until it’s light and fluffy. This is where you can imagine the butter doing a little happy dance.
- Step 4: Add the eggs, one at a time, followed by the vanilla extract into the butter mixture. Mix until it’s smooth and silky, like a well-prepared ghost.
- Step 5: Slowly add the dry ingredients to the wet ones, alternating with the milk. Don’t be afraid to let it mix like it’s at a Halloween party!
- Step 6: Pour in the batter into a skull-shaped cake pan (or any shape you desire). Spread it out evenly, making sure to channel your inner artist!
- Step 7: Pop it into the oven for about 30 minutes—or until a toothpick comes out clean. This is where the cake starts transforming—a baking metamorphosis!
- Step 8: Once baked, let it cool in the pan for 10 minutes, then transfer it to a wire rack. Let those spooky flavors settle in!
- Step 9: When completely cool, decorate with your favorite icing and spooky toppings. This is a great time to let your creativity flow.
- Step 10: Cut it, serve it and wait for the mmmm sounds to erupt from your guests!
How to Serve It
Now that we have our creepy creation, it’s time to think of presentation. Here’s how to serve this gore-geous delight:
- Serve it on a spooky platter – Maybe a haunted plate that looks like it’s been through a horror movie or just a classic black one!
- Garnish with edible decorations – Think ghoulish gummy worms or bloody red raspberry sauce. You can sprinkle some powdered sugar on top, transforming it into a snowy graveyard!
- Pair it with a drink – Try serving it with a spooky drink like witches’ brew or black cherry soda for a festive twist.
- Make a Halloween centerpiece – Slice it up, arrange the pieces on a cake stand, and surround it with little spooky figurines, or even fake spiders for an extra scare!
- Enjoy with friends and family – The best thing to serve with any treat is laughter and good company. Share the experience and let the chaotic fun begin!
FAQ
- Can I use different pans? Sure thing! Use whatever pan you have, just be mindful that baking times might vary. A cupcake tin, for instance, will turn this into bite-sized spooky goodness.
- What’s the best way to store leftovers? If there are any, keep them in an airtight container; you’ll definitely want to snack on it later.
- Can I make it gluten-free? You bet! Substitute the all-purpose flour for a gluten-free blend. No ghostly gluten will haunt you!
- How can I make it spookier? The trick is in the decorations. Use colored icing or food coloring to give it a blood-spatter look or craft a graveyard scene on the top!
- Is it really that chocolatey? Absolutely! This cake is like chocolate heaven. If your taste buds are ready for a wild ride, you’ll love every bite.
Conclusion
So there you have it, my friends! The Chocolate Skull Cake—your ticket to achieving Halloween dessert glory. I can just imagine you hosting your party, presenting this dark delight, and seeing the amazed expressions on everyone’s faces. I love inviting loved ones around, laughing until our bellies hurt, and devouring the cake (or fighting over the last slice). It’s not just about the cake; it’s about the memories we create baking and sharing it. I hope you give this recipe a go and maybe even sprinkle a little of your personality into it. When you do, please share your spooky variations and funny tales. Let’s keep this festive spirit alive and delicious together!