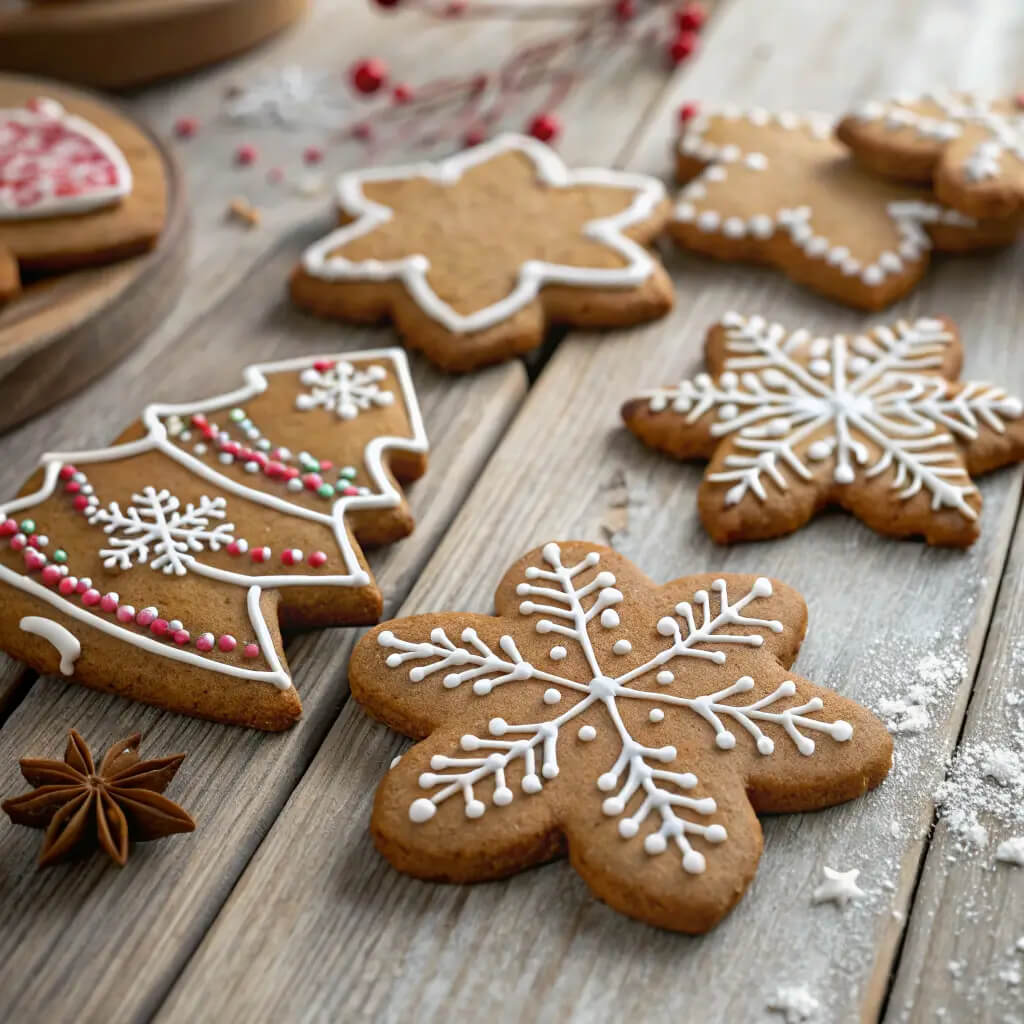
No spread gingerbread cutout cookies, perfect for holiday decorating and snacking
You know that moment when you’re trying to impress your friends with your culinary skills, and you end up creating a kitchen disaster that even a professional chef would shy away from? Well, that was me on a fateful afternoon during the holidays a few years back. I decided it was time to bake gingerbread cookies from scratch, all while attempting to show off my “baking prowess” armed only with a pint-sized apron and a questionable recipe scribbled on a ketchup-stained napkin. The cookies turned out to be a little less “gingerbread” and a little more “charcoal,” if you catch my drift. Friends still talk about how we had to gnaw on the ‘cookies’ as if they were ancient artifacts instead of festive treats.
But after that humbling experience, I rolled up my sleeves, did some serious recipe research, and discovered the perfect no spread gingerbread cutout cookie recipe. I can guarantee that these cookies won’t end up looking like mapcoasters or taste like edible bricks. In fact, they’re perfect for decorating and snacking! With their spiced aroma and whimsical shapes, every bite takes you straight to holiday wonderland. So grab your rolling pin and your favorite cookie cutters! I’m about to take you through a delightful adventure of cookie-making that will leave your friends’ jaws dropping in culinary amazement.
Every year, I look forward to the holiday season, eagerly gathering my cookie-making supplies as if they were precious artifacts. From festive cookie cutters to sparkly sprinkles, I find joy in every step of the baking process. And it’s not just about having the right tools. It’s about the whimsical experiences, the occasional flour fight, and the sweet rewards at the end! There’s something magical about creating gingerbread men (or women) that just makes everything feel right in the world. So, let’s not waste another moment; let’s meet your new favorite holiday cookie!
Why This Recipe is Great
- It’s super easy to make – Honestly, if I can whip these up without causing a kitchen apocalypse, so can you. This luscious dough doesn’t require a secret text written in baking hieroglyphics.
- Perfect for decorating – Grab those sprinkles, icing, or even your famous “interesting” designs. Trust me, creativity is the name of the game here, and I won’t judge your cookie art.
- Deliciously spiced – The aroma that fills your kitchen will have you feeling like a gingerbread-scented goddess! Or god! Or cookie overlord! Seriously, it’s a scent you want to surround yourself with!
- Great for sharing – Friends and family will think you’re some kind of Santa’s elf, gifted with baking skills. And isn’t spreading joy and cookies the best part about the holidays?
- Chewy yet sturdy – These cookies pack just the right amount of chewiness. You can cut them into adorable shapes without fear of them turning into pancake-style disasters.
Preparation & Cooking Time
- Total Time: 2 hours
- Preparation Time: 30 minutes (and yes, that includes all the “oops” moments)
- Chill Time: 1 hour (because good things come to those who wait)
- Baking Time: 10-12 minutes (enough time to dance around the kitchen)
- Servings: Approximately 24 cookies (or around 12 if you’re feeling extra snacking)
- Calories per cookie: Approximately 80-100 calories (but they’re festive, so consider it a holiday miracle!)
Ingredients You Need
Alright, my baking buddies, here’s your invitation to the gingerbread party. Grab a shopping bag and get ready for some ingredient shenanigans!
- 3 ¼ cups all-purpose flour – Think of this as the magical snow that will hold everything together.
- 1 teaspoon baking powder – The superhero that helps our cookies rise to the occasion.
- 1 teaspoon baking soda – You could say it adds the “bang” to our baking!
- 1 tablespoon ground ginger – Aromatic goodness that says ‘holiday cheer’ in every bite.
- 1 tablespoon ground cinnamon – Because every good cookie needs a sprinkle of warmth.
- ½ teaspoon ground nutmeg – The spice that adds some sass to our delightful dough.
- ½ teaspoon salt – It’s a balanced cookie; it needs its salty side.
- 1 cup unsalted butter, softened – The foundation of lusciousness! (A little extra never hurt anyone).
- 1 cup brown sugar, packed – Directly from Sugar Land, it’ll make these cookies oh-so-sweet.
- 1 large egg – The binding agent and the ultimate team player.
- 1 cup molasses – The magic liquid that’ll give the cookies a rich flavor.
- Sparkly frosting and sprinkles of choice – Also known as “the crowning glory” for our cookie masterpieces.
Ingredient Highlights & Variations
Let’s dish about the key players in this tasty drama. Each ingredient has its tale to tell!
- All-Purpose Flour: This is your canvas. You can use gluten-free flour too, but make sure it’s a one-for-one baking solution! We all want to share cookies, not debates!
- Baking Soda vs. Baking Powder: The dynamic duo! Baking soda reacts with the molasses, making your cookies rise, while baking powder is like the cheerleader in the background, helping to make things fluffy.
- Molasses: Not only does it add rich depth, but it also packs in nutrients. A dark hero in the cookie world! Plus, it’ll remind you that you’re in a holiday wonderland amid all the yuletide joy.
- Brown Sugar: Got a sweet tooth? This sugar lends a caramel-like flavor to our cookies. But you could also swap in coconut sugar for a twist if you’re feeling adventurous.
- Spices: Ginger, cinnamon, and nutmeg all come together to create an aromatic punch. Substitutions are welcome—throw in some allspice, or make it spicy with a hint of cayenne. Just a hint – we don’t want to breathe fire!
Step-by-Step Instructions
- Step 1: In a large bowl, whisk together flour, baking powder, baking soda, spices, and salt. This is like your cookie hug before the real fun begins.
- Step 2: In another bowl, mix butter and brown sugar until fluffy (around 2-3 minutes). Channel your inner cookie wizard – it’s about to get magical!
- Step 3: Add in the egg and molasses until well blended. Let that mix blend together like best friends at a holiday party!
- Step 4: Gradually add the dry ingredients to the wet, mixing until combined. It will start to form a cohesive dough; resist the urge to eat it by the spoonful—unless you’re alone; then go for it! You deserve it!
- Step 5: Wrap the dough in plastic wrap and chill in the fridge for at least one hour. This process makes it easier to roll out later. Plus, who doesn’t love a good chill session?
- Step 6: Preheat your oven to 350°F (175°C). Just about ready for the magic to happen!
- Step 7: Roll the dough on a floured surface and cut into shapes with your favorite cookie cutters. Get extravagant—and don’t be shy about how festive you want to get!
- Step 8: Place the shapes onto a parchment-lined baking sheet, leaving space. Bake for about 10-12 minutes… while the aroma does a happy dance in your kitchen.
- Step 9: Remove from the oven and let cool. They’ll firm up and get ready for decoration. You know what they say, “good things come to those who wait”!
- Step 10: Decorate and indulge. You’ve mastered the act of cookie creation—show them off for your holiday gatherings or keep them all for yourself! No judgment here.
How to Serve It
Now that we’ve conquered the art of cookie-making, let’s get fancy with the presentation, shall we?
- Serve with a hearty mug of hot cocoa or even a fancy chai latte; it’s like a cozy hug that warms your soul!
- Garnish with colorful sprinkles, edible glitter, or icing. And get creative; these little chefs deserve a touch of pizzazz!
- For a festive touch, arrange them on decorative plates—bonus points if you can discover cute Christmas-themed dishware.
- Set the mood with some twinkling lights or holiday music while serving. It transforms a simple cookie-serving occasion into a delightful celebration!
- Pair them with a storytelling session around the fireplace. Nothing says family bonding quite like food and fun stories!
FAQ
- Can I use gluten-free flour? Absolutely! Just make sure to use a one-for-one substitute, and you’ll still be dancing in cookie heaven.
- What if I don’t like ginger? No problem! You can mix it up with pumpkin spice or your favorite baking spice. Just remember to keep it fun!
- Can I make these cookies ahead of time? Yes, indeed. You can freeze the dough for up to a month. When you’re ready, simply bake, and watch everyone marvel at your cookie wizardry.
- Are my cookies supposed to be hard after baking? Nope! They will firm up as they cool, so avoid judging them straight out of the oven. Patience is key here, cookie pal.
- Can I decorate them ahead of time? Sure! Just know they might look like they had a wild party without you, but that’s half the fun!
Conclusion
So, there you have it, my holiday-loving pals! You’re now equipped to whip up a batch of no spread gingerbread cutout cookies that won’t disappoint. I encourage you to sprinkle your own magic on them and enjoy the process wholeheartedly. Remember, the kitchen is a place for laughter, quirks, and a bit of chaos—but it’s also where culinary masterpieces are born. Invite your friends or family over and experience the joy of cookie decorating together! I can’t wait to hear how yours turn out or any quirky variations you throw into the mix. Happy baking and may your cookies be as delightful as your sense of humor!