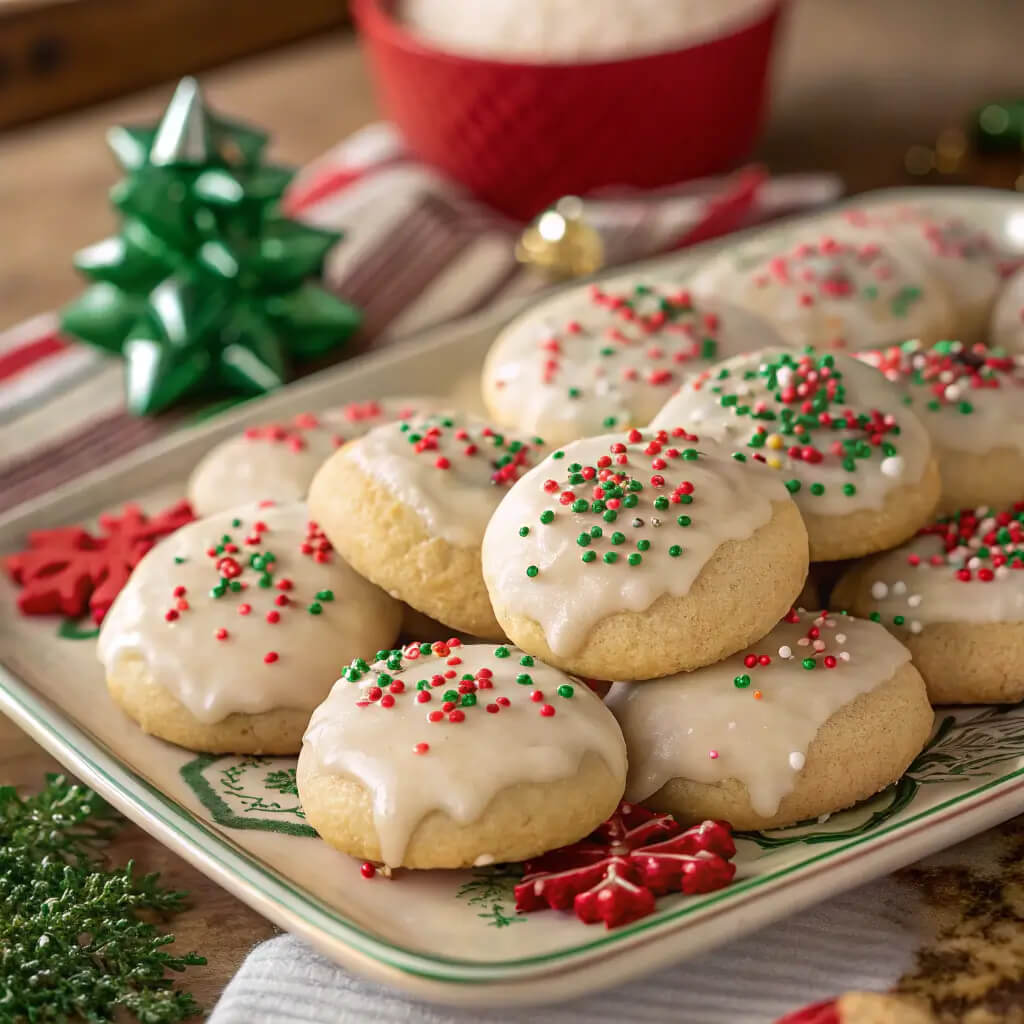
Italian Christmas cookies, a festive and sweet holiday tradition
Ah, Italian Christmas cookies. Let me take you back to a chilly winter evening a few years ago when the aroma of fresh cookies wrapped around my kitchen like a warm hug. Picture this: I’m standing in my tiny apartment, flour dust covering every available surface, a rogue batch of cookie dough clinging persistently to my cheek (cute, right?). It was my first attempt at making these delightful treats, and let me tell you, there was a bit more chaos than finesse. I had flour in my hair, and every corner of my kitchen looked as if a holiday baking explosion had just occurred. Spoiler alert: it totally had.
I frantically flipped through my old family recipe book, desperate to find my Nonna’s famous recipe. Halfway through reading, I started wondering if I should really just give up and order takeout. But then I remembered all the times I had watched my Nonna whip up these gorgeous Italian cookies while humming along to her beloved Paolo Conte. There was something magical about how she would effortlessly mold dough into shapes more beautiful than anything I could create. It hit me: I was channeling my inner Nonna. So, I rolled up my sleeves, put on my best apron (yes, even if no one sees it, my apron game is strong), and dove back in.
After some “interesting” flavor experiments and a few questionable shapes, I witched my way through a batch of Italian Christmas cookies that blew my mind. Truly, they were so good they could have given Santa himself a tough decision for treats this season. I realized that this simple recipe is not just about cookies. It’s about family, tradition, and yes—occasionally giving a flour-covered hug to the person you love nearby.
Why This Recipe is Great
- It brings holiday joy – Seriously, these cookies can turn your home into a holiday wonderland. Who needs snow when you have the sweet aroma of cookies wafting through the air?
- It’s made with love – You’ll find yourself spreading love in the form of cookie dough. Who can resist a batch of cookies made with genuine affection? Well, not I!
- It’s a bonding experience – Whether you’re baking with family or friends, there’s something about cookie making that transforms people into joyful little elves. Just be ready for flour wars!
- Perfect for sharing – They’re the perfect little gifts to give. Trust me, you’ll be a culinary Santa handing out absolute deliciousness!
- They’re versatile – Experiment with toppings, fillings, or even the dough flavor. You might discover that peppermint chips can take your cookies from “yum” to “OH MY GOSH!”
Preparation & Cooking Time
- Total Time: 2 hours
- Preparation Time: 45 minutes
- Cooking Time: 15 minutes
- Cooling Time: 1 hour
- Servings: About 24 cookies
- Calories per serving: Approximately 100-120 calories
- Key Nutrients: Protein: 2g, Carbs: 12g, Fat: 6g
Ingredients You Need
- 3 cups of all-purpose flour – The base of all things delightful, with a sprinkle of magic.
- 1 cup of sugar – Because what’s sugar if not the sweet fairy dust of baking?
- 1 cup of unsalted butter – Sure, this adds creaminess, but it’s also a ticket to cookie bliss.
- 2 large eggs – The unsung heroes of any baking adventure.
- 1 tablespoon of vanilla extract – A dash of this, and your kitchen will smell heavenly.
- 1 teaspoon of baking powder – The little boost your cookies need to rise up to the occasion.
- 1/2 teaspoon of salt – Just a pinch to balance out all that sweetness.
- Nonpareils or colored sprinkles – For that extra festive flair, because visually appealing cookies are way more fun.
Ingredient Highlights & Variations
Let’s dig into the wonders of our ingredients, shall we? I mean, who knew flour could make or break a cookie experience?
- All-purpose flour: The workhorse of baking, it assures you that whatever you’re trying to make will at least resemble a cookie. But did you know you could also substitute it with almond flour for a healthier twist? Just adjust the ratios slightly.
- Sugar: If you want to get adventurous, you might think about using brown sugar instead of white. This will give your cookies that deep, caramel-like flavor. Yum. Plus, who doesn’t love a bit of richness?
- Butter: Opt for vegan butter if you want a dairy-free version. I promise it still plays well with other ingredients. Cookies should love everyone!
- Vanilla extract: My personal favorite. Consider infusing your own vanilla using vodka and vanilla beans for a unique flavor. You’ll impress everyone and feel like a total kitchen magician!
- Sprinkles: The joyous confetti for our cookie fiesta. Swap em out for crushed candy canes for a minty crisp surprise!
Step-by-Step Instructions
- Gather your ingredients: Make sure all your ingredients are ready to go because the adventure is about to begin.
- Preheat your oven: Set it to 350°F (175°C) and get your baking sheets ready. You know the drill.
- Cream the butter and sugar: In a large mixing bowl, cream the butter and sugar until fluffy. Think of it as giving your ingredients a little spa day.
- Add the eggs and vanilla: Crack in those eggs one at a time; they deserve their moment in the spotlight. Then stir in the vanilla.
- Mix the dry ingredients: In a separate bowl, combine the flour, baking powder, and salt. Gradually add it to the wet mixture while mixing. Be careful not to overdo it. Your cookies are delicate creatures.
- Chill that dough: Wrap the dough in plastic wrap and chill for at least 30 minutes. This gives it some downtime to think about life.
- Shape the cookies: Once chilled, use a small scoop or a spoon to form dough balls and place them on your baking sheets. Give them some space; they’re going to spread out a bit.
- Sprinkle it up: Top each ball of dough with nonpareils or colored sprinkles. Just don’t do it too hastily; these beauties deserve a bit of care.
- Bake: Pop those cookies in the oven for about 12-15 minutes. Keep an eye on them; we want golden-brown perfection, not charcoal.
- Cool off: Once baked, give them some time to cool down on the baking sheet before transferring them to a wire rack. This is crucial—warm cookies will crumble if you rush!
How to Serve It
Serving Italian Christmas cookies is like giving a gift to your friends—and yourself. So, let’s dress them up!
- Serve with cheer: Place cookies on a decorative holiday platter and enjoy them with a warm beverage. Hot cocoa or a festive spiced tea? Yes, please.
- Dress them up: Dust a bit of powdered sugar over the top for a snowy effect. Just make sure you do it after they cool. Otherwise, it looks like a sweetened mess on a hot cookie.
- Pair with other festive goodies: Consider serving these alongside a cheese board or fruit platter. Yes, a bit of sweet and savory harmony goes a long way.
- Festive packaging: Thinking of gifting these cookies? Wrap them in clear bags tied with colorful ribbons. Trust me, your loved ones will appreciate both the cookies and the presentation.
- Cookie plate tradition: Create an assortment platter with various holiday cookies. It’s about presentation, darling. Make it a delightful spread!
FAQ
- Can I freeze these cookies? Absolutely! They can be frozen for up to three months. Just make sure they’re in a solid airtight container, and they’ll be ready for a snowy day!
- How do I know when they’re done? Look for a light golden edge. If they look like they’re about to rock the tan lines of Cookie Island, it’s time to take them out.
- Can I add nuts? Yes! Chopped pistachios or hazelnuts would bring an exciting crunch. Don’t be afraid to get nutty.
- What if I don’t have colored sprinkles? No worries! Some chopped chocolate or a drizzle of icing can steal the show in close contests.
- Can I make these gluten-free? Sure thing! Use a gluten-free flour blend, and you’ve got yourself a delightful GF version ready to please.
Conclusion
So, there you have it, my cookie-loving companions. These Italian Christmas cookies are more than just treats; they carry warmth, love, and the joyous spirit of the holidays. I can’t think of a better way to celebrate the season than indulging in these delightful bite-sized bundles of happiness, whether you’re sharing them with loved ones or treating yourself to a well-deserved reward. I’d love to hear how your baking adventure turns out or if you’ve added a fun twist to the recipe! Whether you’re reminiscing over family traditions or starting new ones, let’s make this season sweeter, one cookie at a time. The apron awaits you!